Fried Sage and Cheese Ravioli

I don’t know about you all but I am thankful for some cooler weather. Well, actually cold temps are making me happy right now.  I needed a break from cutting my grass!!

I love my yard, my flower and a veggie gardens and of course my patio.  But, keeping it going all summer is hard work.  And usually by September, I am tired and fed up with the humid and hot weather.  Not to mention the bugs!

All my garden beds are sleeping and I think my lawn is finally sleeping!  My back and hurting shoulder are thankful for the rest.  But in all honesty, after Christmas I’ll start planning the garden beds for the spring.

Any new flowers or veggies I want to try will be on a list and I’ll start to draw out designs too. But, let’s get to this recipe! 

The one thing I did have going, up to Thanksgiving anyway, was my pots of herbs by the back door.  They are done now but up to the Thanksgiving holiday I was trying to create some new recipes to use up the herbs.

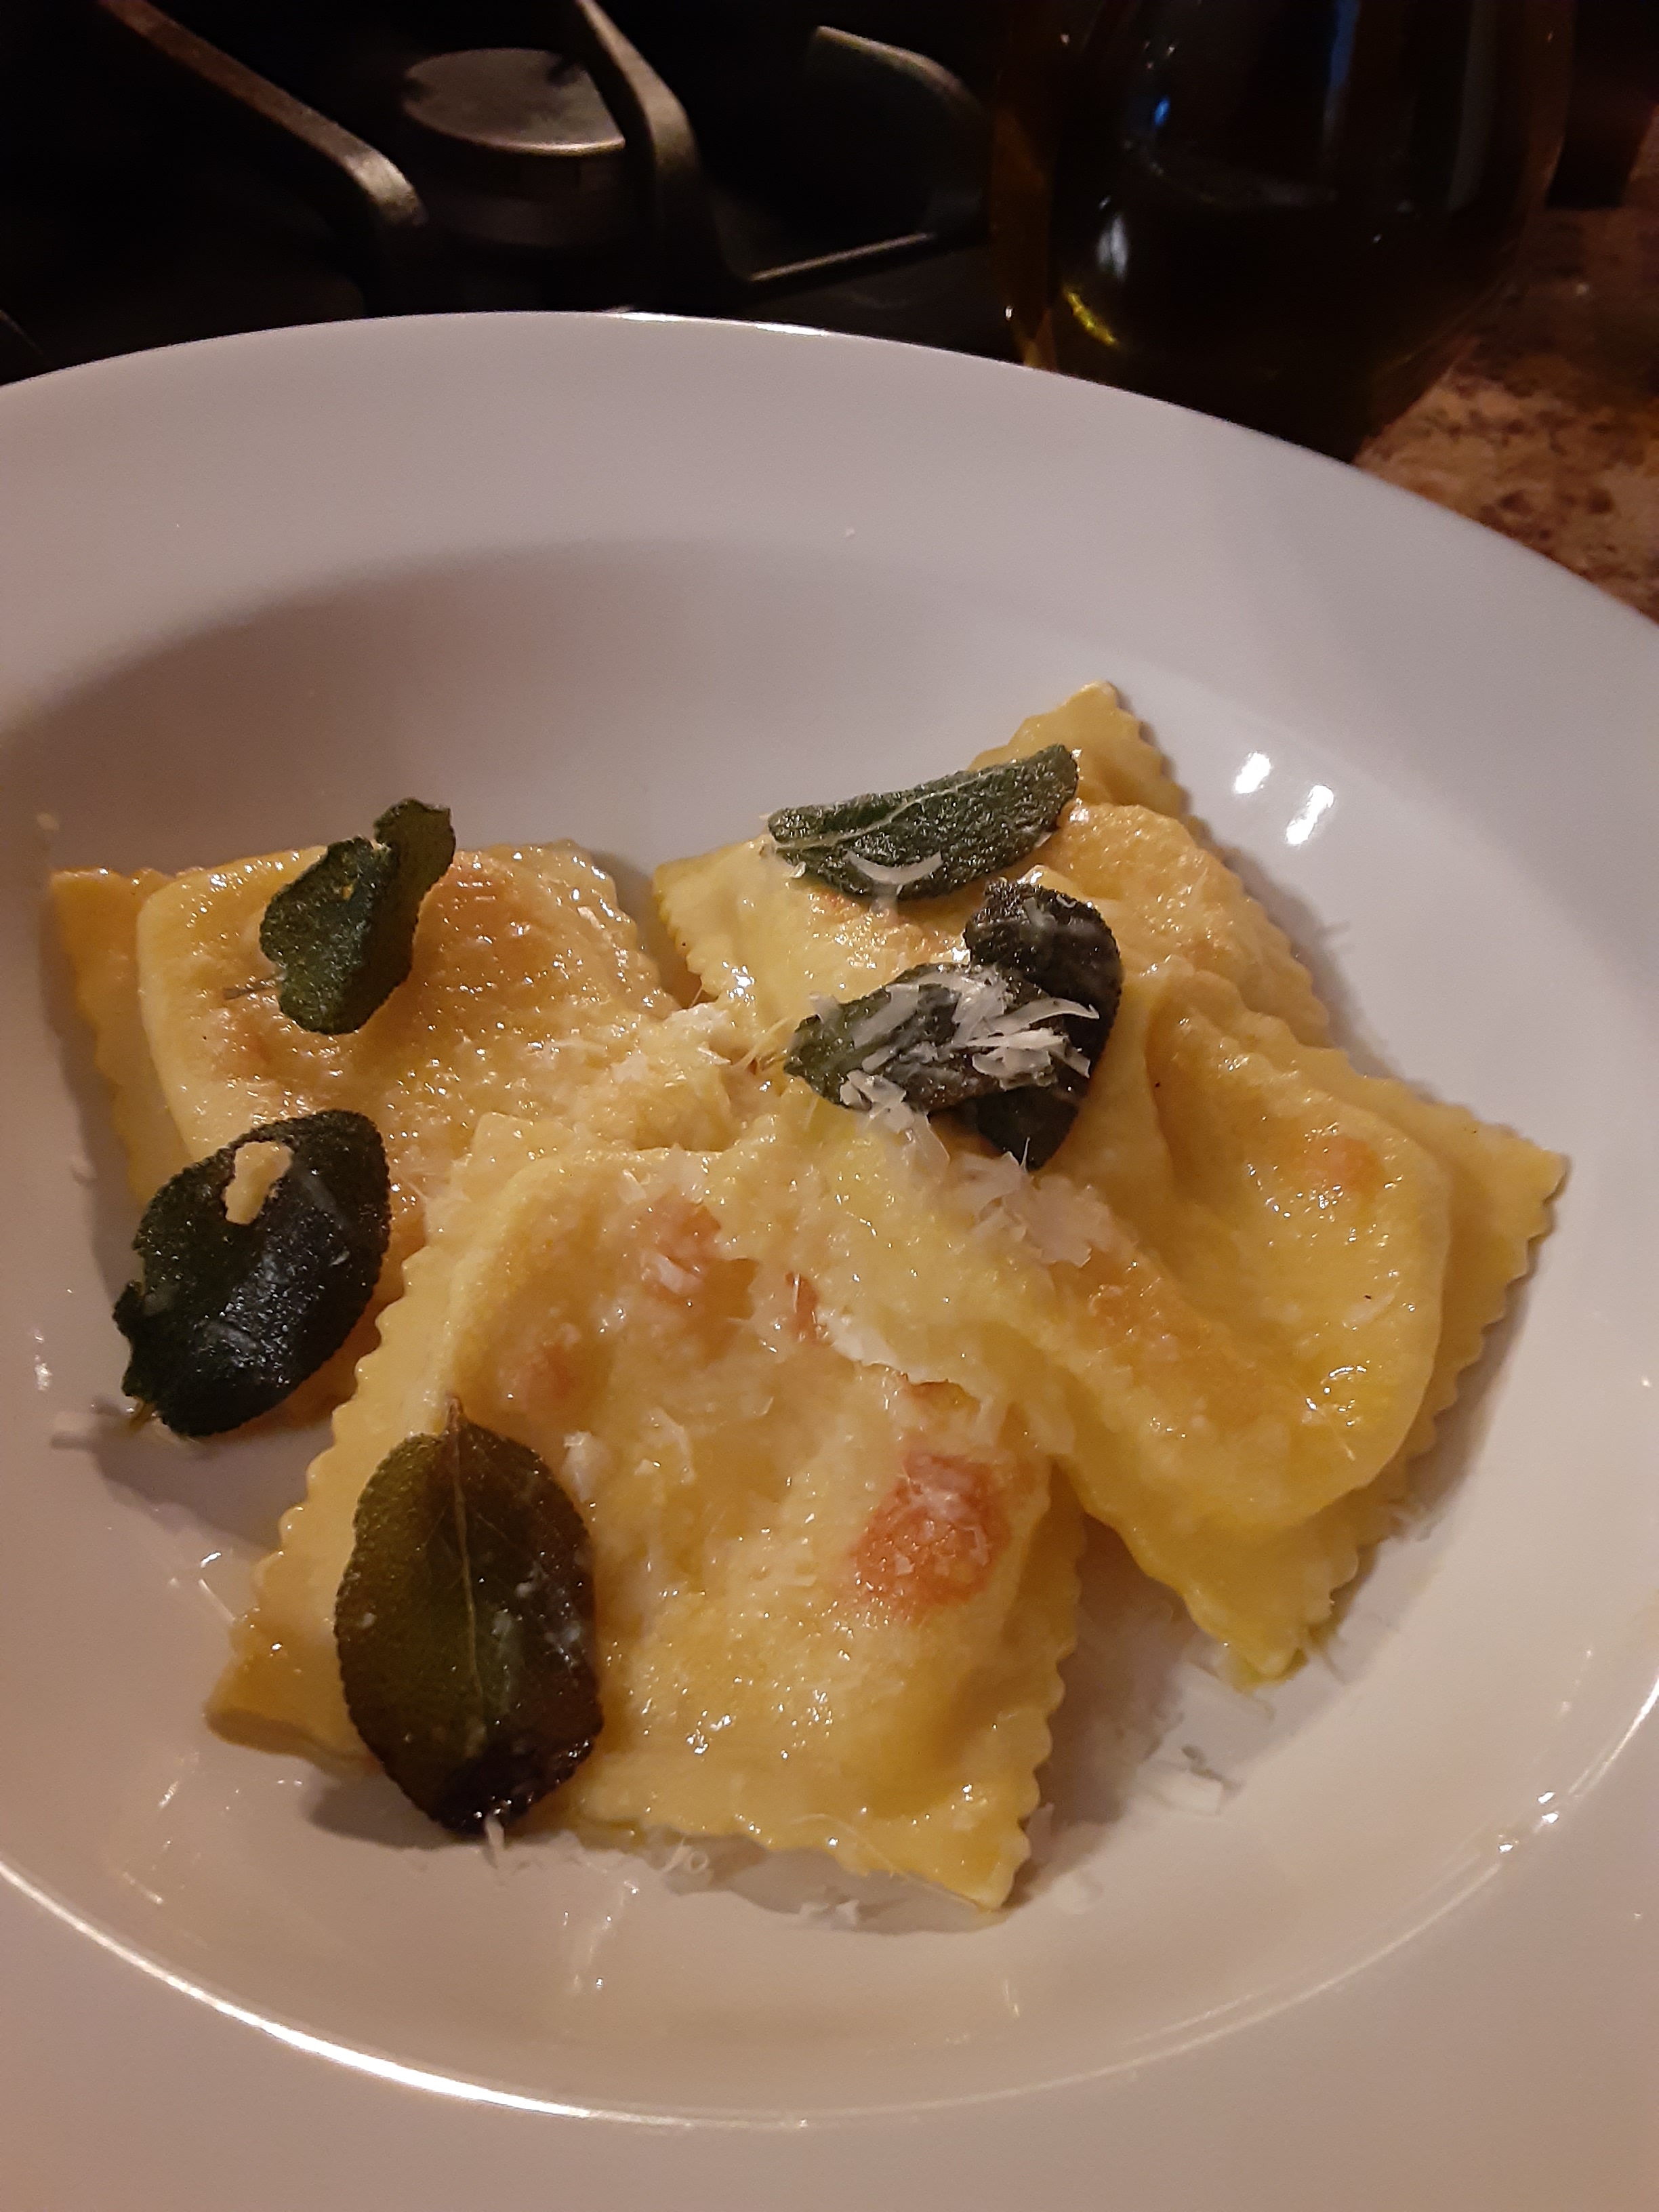
And this fried sage and cheese ravioli did NOT disappoint!  It comes together quick and goes perfect with a small side salad and a little rosemary parmesan flatbread (I’ll post that next).

The first thing I did was get a little pot of water to boil, you do still have to cook the frozen ravioli.  If you are making fresh, I would still do a quick simmer with them.  The uncooked dough would not be very tasty I’m sure.

While the water came to boil I started to melt some butter along with a little olive oil. When it was hot, I tossed in some clean and DRY sage leaves.  I kept the heat low enough so it didn’t burn while the ravioli finished cooking.

As soon as the ravioli was done, I transferred each ravioli to some paper towels to dry and then carefully added them to the hot butter and oil.  Be careful, it can still spit a little.  Do not over cook, the dough can get a little tough. 

Then I just gently fried the ravioli until a light golden brown. I did sprinkle with some salt and pepper. Transfer to a plate, sprinkle with fresh grated parmesan cheese and enjoy.  The entire process only took about 15 minutes.

A glass a Pinot Noir went well with this dish!

Enjoy!!

FYI, be sure to follow me on Facebook, I have a lot almost daily ramblings and posts. I have hardly posted anything here lately because I have been dealing with a lot of tummy issues for almost 2 years now, and I get sick on a lot. So cooking is few and far between because I am still trying to find what works for me. Although sometimes that changes. It’s been frustrating to say the least. Anyway, see you over on Facebook under Kartwheels in the Kitchen.

Apple Galette with a Gingersnap Crumb Topping

How is everyone enjoying this gorgeous fall weather?  It’s been quite lovely here in south central PA.  And I am really enjoying the fall foods, apple desserts, pumpkin everything, and lots of warm spices like cinnamon, cloves and allspice.

Not only do I love everything pumpkin in the autumn months, I also love apple and cinnamon.  Apple pie, apple crisp, apple cider doughnuts and apple cider drinks, yum!

My first try at apple cider doughnuts was in a visit to my family in Mystic, CT.  Then took me to this little apple mill, they left you in the building where they pressed the apples to make the cider.  All the old fashioned way, it was awesome.

My family told me they had they best apple cider, and I totally agree, it was!  And as I mentioned, it was  the first time I had apple cider doughnuts.  That was years ago but now they seem to be everywhere.  Which I am VERY happy about!

Anyway, back to the galette.  I suppose this is also a fancy word for rustic apple pie, either way I loved this tasty dessert!

I used a store bought pie crust that I had in the freezer, I just left that come to room temp before using. I like to make my own pie crust but I had this in the freezer and wanted to get it used up before it became freezer burnt.

I cut 4 medium to large apples, and chopped them into bite size pieces.  You can use any apples you want or have on hand but you will need to adjust the sugar according to the sweetness of the apples you are using.

I placed those apple chunks in a bowl and added sugar and cinnamon.  I used about 1/3 cup white granulated sugar and 2 T of light brown sugar, along with 1 tsp cinnamon.  I coated the apples well and left them sit in the bowl while I made the crumb topping.

I placed about 6-7 broken gingersnaps in a plastic bag and smashed them to nice crumbs but leaving a few large chunks too. I added them to a separate bowl.  To the gingersnaps I added a heaping  ¼ c of old  fashioned oats, ½ tsp cinnamon, 2 T brown sugar,  2 or 3 T flour and 3 T of cold butter cut into small cubes.

Then I used my trusty pastry cutter to cut the topping into nice crumbs. 

Next I placed the pie crust dough on a lined cookie sheet.  I used a baking mat but you can also use parchment paper. I placed the apple chunks in the middle of the crust and left them spread to about 2 inches from the edge of the dough, then I folded up the edges and pressed lightly together.  I piled on the crumb topping, letting it fall over onto the crust.

I popped that in the oven at 350 degrees for about 35 to 45 minutes, or until golden and the apples are tender.  You know your oven!

This is so delicious served warm, with or without ice cream!  Ice cream would be better in my personal opinion.

Enjoy!

Apple Galette with Gingersnap Crumb Topping

1 pie crust

4 medium to large apples, peeled, sliced and cut into chunks

1/3 cup white granulated sugar

2 T light brown sugar

1 tsp cinnamon

For the topping:

6-7 gingersnaps

¼ c old fashioned oats

½ tsp cinnamon

2 T brown sugar

2-3 T flour

3 T cold butter, cut into small cubes

Preheat oven to 350 degrees

  1. Place apple chunks in a bowl, add remaining ingredients and toss gently. Set aside,
  2. In a separate bowl add all the ingredients for the topping and using a pastry cutter or 2 knives, cut in the butter until it becomes crumbly.
  3. Place pie crust on a lined cookie sheet (parchment paper or a baking mat) add the apples in the center and gently spread out to about 2 inches from the edge.  Fold up the remaining crust to hold apples in and gently press.
  4. Top with the crumb topping to cover all the apples and letting some fall onto the crust.
  5. Bake for 35-45 minutes at 350 until golden and apples are tender.

Creamy Roasted Butternut Squash Soup with Warm Fall Spices!

I was not a huge butternut squash soup, I made it before but just was not a fan.  So either my tastes have changed over the years or I just made it better this time.  I don’t know for sure but this is really good!

I was schedule for oral surgery and knew I would need soup for the first few days so what better than a hearty, fall and creamy soup to fill my tummy and comfort my soul.

I bought squash that was already peeled and chopped, the container was 32 oz and I used every bit it.  I also chopped and peeled one large apple and 1 large carrot.  I spread all of the chunks over a parchment paper lined baking sheet, drizzled with olive oil and sprinkled with salt, pepper, a little cinnamon and nutmeg.  I gave it a little toss and then baked for about 30 minutes at 375 degrees.  Keep a close eye and toss often.

When the squash was just about ready to come out of the oven, I sautéed a little onion in olive oil in my soup pot. When the squash was done, I added it to the soup pot.  Next I added a 32 oz container of chicken bone broth, but you can use whatever broth or stock you want.

I added more warm, fall spices too! A little more ground cloves, cinnamon, allspice and a hint of ginger. I brought this to a light simmer and cook for about 10 minutes.  You can certainly add the amount of spices to your preference, but I was going for all the warm spices that I could!

I turned off the heat and used my immersion blender to puree until completely smooth.  You can transfer your soup to your blender, please use caution as blending hot liquid could blow out of the blender.

As soon as the soup is creamy and smooth, I added about one cup of coconut milk.  But you can add light or heavy cream if you want, half and half would work too.  I also adjusted the spices, at this point.  I added more cloves and cinnamon. Let this heat completely and then serve.

*Please note, I added and adjusted the spices through the entire cooking process to achieve the warm, fall taste I was after.  You can eliminate a spice if you don’t like it.

Creamy Roasted Butternut Squash with Warm Fall Spices

32 oz butternut squash, peeled and chopped into cubes

1 large apple, peeled and sliced

1 large carrot, peeled and cut into chunks

1tsp to 1 T of spices-ground cinnamon, cloves, allspice, nutmeg *adjust to your preference

1/8 tsp ground ginger

Salt and pepper to taste

Olive oil for coating the vegetables

1 small onion, diced

32 oz box of chicken bone broth (any broth or stock will work)

1 cup coconut milk (cream or half and half works too)

  1. Preheat oven to 375 degrees. Place all vegetables on a parchment paper lined baking sheet. Drizzle with olive oil and a sprinkle of cinnamon, nutmeg, salt and pepper. Toss lightly to coat. Bake for about 30 -35 minutes.
  2. Sautee onion in olive oil in a large soup pot, just before pulling the vegetable out of the oven.
  3. Add the roasted veggies to the soup pot with the onions and add the broth or stock. Add some spices, I suggest one teaspoon, or a sprinkling at a time (see note above). Simmer for about 10 minutes.
  4. Using an immersion blender, blend soup until completely creamy.
  5. Add the coconut milk, and taste.  Adjust spices as needed and preferred.

Pumpkin Scones

In all my years of baking, I don’t ever remember making scones that I love as much as these! Maybe it’s because they’re pumpkin, I don’t even care because I love them so much. I know I’ll be making them a lot during the cold weather season.

These scones were perfect with my latte for breakfast. And they also made a good snack in the afternoon. I seriously could not stay out of the container! I kept picking at them, taking little nibbles now and then! It looked like a little mouse had invaded my kitchen.

The recipe is a Damaris Phillips recipe, LOVE her. I pretty much followed the recipe for the scones exactly as called for EXCEPT the milk. I cannot do regular milk, all I use is 2% lactose free for my latte’s and that worked fine.

For the glaze, I did not sprinkle the scones with the raw sugar. Instead of the orange glaze, I made a cinnamon maple glaze. For the glaze, I started with the 1 cup powdered sugar, added about 2T of good maple syrup, a few dashes of cinnamon and then thinned it out with enough water to be able to dip the scones in the glaze and have it stay on the scone.

I will definitely be trying the orange glaze but I really like the maple with the pumpkin. I think an orange buttercream would be delish too, that’s on my radar for later too.

I hope you give these a try, they are absolutely my favorite scones!

Here’s the recipe:

Damaris Phillips Pumpkin Scones with Orange Glaze

Preheat oven to 400 degrees

For the scones:

½ cup packed light brown sugar

2 tsp baking powder

1 T pumpkin pie spice

½ tsp salt

2 to 2-1/2 cups all-purpose flour, more for dusting

6 T cold unsalted butter, cut into ½ inch cubes

½ cup canned pumpkin puree

1 large egg

½ cup whole milk

For the orange glaze:

1 cup powdered sugar

1-1/2 to 2 T orange juice

1 tsp orange zest

2 T raw sugar

In a medium bowl, combine the brown sugar, baking powder, pumpkin pie spice and salt. Add the flour to combine and then cut in the butter until the mixture resembles coarse meal.

In a separate bowl, combine the pumpkin, egg and milk.

Make a well in the dry ingredients and pour in the wet ingredients. Fold until just combined. Turn dough onto a floured surface and knead until smooth, about 5-7 times.

Form into a flat disc about 8 inches wide. Cut disc like a pie, into 8 slices, and place the slices onto a parchment lined baking sheet. Bake until golden, about 12-15 minutes.

For the glaze, mix the powdered sugar, orange juice and orange zest. Cover with a damp towel until ready to use. Then dip the tops of each scone in the glaze and let the excess drip back into the bowl. Sprinkle the glazed scones with the raw sugar.

Mimi’s Garden – Fall Gardening Chores, Part 2

I’m working on my vegetable gardens to prepare for fall. It can be a messy one too! And I’ll miss walking through my yard to my veggie gardens and plucking yummy food for my tummy.

This year I neglected some of my tomato plants and did not keep them as groomed as I like. They grew like weeds too, I am still getting tomatoes and it’s almost the end of September. Night temps have been in the 40-50’s already. So I had to get busy!


Since each tomato plant was more a bush, it took me a little longer this year to give them their fall haircut. LOL I start by cutting back the smaller branches, and finding the top if each stem to cut back. Any new flowers and smaller branches need to be removed so the plant can concentrate on growing the fruit that is already on the branch, not producing new growth. That is why the top of the branch needs to be cut off too; it would continue to grow, it’s a vine after all. Again, this will stunt the growth of the plant so it can focus on the existing fruit.

So any branches without tomatoes I removed and the others all were trimmed. I also removed any tomatoes that looked in rough shape.


Next up, the pepper plants. I totally removed one plant, it had completely done its job and had no more blooms.   I still have 3 more pepper plants, thankfully they still have peppers growing. I didn’t have much luck with these plants, I was hoping for a large supply so I could jar roasted red peppers. Maybe I’ll have better luck next year.

For my fall garden I planted 2 types of lettuce seeds, spinach, and radishes. I’ve never planted them this late so I am not sure how things will go, but they do well in the cooler temps in the spring so hopefully I will have the same good luck in the cooler autumn temps!


My herb garden consists of 3 large pots. Last year 2 of my thyme plants and 2 rosemary plants survived the winter and came back in the spring. The rosemary didn’t grow very well for me this year though. All that sage, I started making sage bundles to burn, and I added some summer flowers in the middle of the bundles. Cannot wait to try them!

But for all of the herbs, I have been drying them for use over the winter, pasts are HERE and HERE.

I also grow mint in pots, but I have already tended to them. This was the second summer for the plants and they barely came back so I emptied the pots and will start fresh next spring. I prefer growing the mint in pots because the mint plant is so invasive and will take over the garden bed. Unfortunately, growing it in pots only produces 2 or 3 years of mint and then it dies off. The pots become totally root bound.

After all this work is done, I get to enjoy a winter break and plan next years gardens. Will I set up any new raised beds??? Maybe… But maybe not, I can barely keep up with what I have now! I love playing in the dirt though, and growing flowers and food. It is so rewarding and a blessing from God to be able to do so.

Happy Autumn friends!

Mimi’s Garden – Fall Gardening Chores, Part 1

Fall is my absolute favorite season. I love the colors, the fragrances, the cooler weather, football, everything apples and pumpkins!

I love spring too, when everything is sprouting and coming to life; poking through the dirt like little praying hands being raised up to the heavens.

But for the autumn months, everything beautiful is preparing for a long nap. To rejuvenate for another display of beautiful blooms next spring.

And for this to happen, there is a lot of work! Plants need to be cut back, or divided, and some just snipping off stems and keeping them rooted in water. The plants that I want to snip and place in water, will sit on a windowsill until early spring and then potted. Sometimes I’m lucky and they survive, and sometimes they do not. But nonetheless, I can still enjoy them for the winter months ahead.


Last year I put all of my potted geraniums and my hibiscus plant in my basement. I cut them back, placed them in the basement still in their pots and they did great! Around late March early April I started to lightly water them, then I brought them up from the basement and as soon as the days were warm enough, I put them outside.

Unfortunately, 2 of them started to grow but then died. The rest survived and have been beautiful all summer. A friend of mine told me that her Mother used to dig them up and hang them upside down by the root ball in the basement. Might have to give that a try this year, some of my pots are too big and heavy for me to try to move.


I’ve already cut back a few plants. We had a very hot, dry spell for a few weeks and it took its toll on the red veined dock and day lilies. The flowers of the day lilies were done blooming but the beautiful leaves became dry and then died so they got a haircut! New leaves have since sprouted new growth though. And the red veined dock is starting to come back too.

All of the cone flowers I’ll try to leave alone, the goldfinches LOVE sitting on them and nibbling at the seed.


The potted spider plants I will not bring back inside. I’ll trim off all the babies and root as many as I can but the momma plants are HUGE and in large pots that I have no place in the house. I try to find homes for them but my friends are in the same situation, no room. This is where a large gorgeous greenhouse in my yard would be great to have!

This is my first year for a Eucalyptus plant, I love cutting the stems and drying them to hang in the shower. This plant is due for a trim and then I’ll bring the pot inside. Hopefully it will do well as a potted plant inside for the winter months.

The purple plant on the left, I think, is a variety of a wandering “dude” but I no longer have the ID card. That entire pot is all from cuttings from last year. The coleus on the right, I’ll take cuttings from that and hopefully be able to pot it next spring.

My beautiful Limelight Hydrangeas, these are my favorite. And by March and I am impatiently watching them, waiting for the buds to pop on the branches. I try to dry lots of bouquets and then share them with friends. I also like to keep dried stems as well, using them for arrangements or wreaths. I like to get a bucket of water, and add some dish soap, then as I cut the stems from the plant, I dip the blooms in the water to kill any unwanted spiders or other bugs that I don’t want inside my house. For the most part this does work but on occasion I do find a survivor!

Another gardening chore is to finish cleaning my fence. I started in the spring and have about ¾ of it done but the heat got to me and I put off the remaining panels for cooler weather. I scrub it by hand using a solution of vinegar and dish soap and it works amazingly well!

I also like to clean out my shed, it’s FILTHY right now. Tons of grass clippings, potting soil, and spider webs. It needs to be reorganized too. And, go ahead and laugh but… I like to give my trash can a good cleaning too. That usually just involves some cleaner being poured inside and then powerwashed.

This year I have lots of spring bulbs to plant too. I’ve been in this house for 5 years now and the only spring bulbs I planted have been the Easter hyacinths my kids gave me.

I have a bunch of dahlias too, those bulbs should be dug up and put in the basement but I don’t, come back fine every year. They make beautiful cut flowers all summer, I’ll miss them!

  This is just one of the five butterfly bushes I have.

My butterfly bushes I try to keep going well into October if possible. We will still have some butterflies, especially the traveling Monarchs. So I keep them going as long as I can. Then they get cut back to ground level. I’ll those beautiful blooms too.


This purple plant, cannot find the ID card, I will take cutting of it as well and hope for the best for next spring.  The hanging plant is a creeping jenny, it comes back each year!  This is the third year in that planter.  And I was able to snag 2 sections of it to make 2 new hanging planters this year.

What plans for you have for your flower beds? Get out there in play in the dirt!

Cinnamon Apple Maple Syrup

So I did this thing.

This terrible, awful thing.

To my already delicious maple syrup.

Sorry, I guess I’m being a little dramatic. But seriously, this “thing” I did to the maple syrup is actually divine!

And I’m guessing if you made it this far into my story after reading the title, you might be just a tad bit interested.

I love French toast, and I love putting apple pieces in my pancakes sooo I thought maybe this syrup would give me the best of both!!

I sliced and apple into thin slices and then chopped them to smaller pieces, you need a cup for this recipe.  I tossed them in a pan over medium heat with 1 tablespoon butter and 1 tablespoon light brown sugar.  Sautee until fork tender.

Then reduce the heat to low and add a few dashes of cinnamon, not too much though! Add 3/4 cup of maple syrup.  Stir until heated through, then remove from the heat and serve.

I just love this syrup, I’m sure you will too.

Cinnamon Apple Maple Syrup

1 cup thinly sliced and diced apple

1 T butter

1 T light brown sugar

3/4 cup maple syrup

Melt butter and brown sugar in a sauté pan over medium heat, add the apples and cook until fork tender.  Reduce the heat to low.  Add the cinnamon and maple syrup,  stir until heated through and serve.

End of Summer White Peach Crisp

I found some incredibly delicious white peaches and white nectarines at the store the other week. They were so sweet, juicy and full of yummy flavor!

I practically inhaled the nectarines. So with the peaches, I made peach crisp. Oh. My. Gosh.

I had 6 large peaches, I peeled them and sliced them into bite size chunks and tossed them in a bowl. I may or may not have eaten a few chunks. I added about 3 tablespoons each of white sugar and brown sugar, I didn’t want to add too much sugar since they were already pretty sweet naturally. Then I added 1 teaspoon of cinnamon, a sprinkle or two of nutmeg, and 1 teaspoon of vanilla and tossed gently. Depending on your peaches, you may need to add more sugar.

In a separate bowl I added ¾ cup of flour, 1/3 cup brown sugar, ½ tsp cinnamon and stirred with a fork to combine. Then I added 6 T cubed, chilled butter and cut in until crumbly. At the end of cutting in the butter I like to use my hands and quickly crumble the mixture too, you do not have to do this but I always feel I need to get in there with my hands and help it along! Sprinkle the crumbles over the top of the peaches and bake at 350 for about 30 minutes or until bubbly and the top is golden.

I made cinnamon ice cream to go with the crisp, it was a perfect combination and a wonderful treat to end the summer.

Here’s the recipe:

Crumb Topping

¾ cup flour

1/3 cup brown sugar

½ teaspoon cinnamon

6 tablespoons butter, cut in cubes

Fruit Filling

6 large ripe peaches, peeled and sliced into bite size pieces

3 tablespoons sugar, more if your peaches are not very sweet

3 tablespoons brown sugar

1 teaspoon cinnamon

1 teaspoon vanilla

Ground nutmeg, few dashes

  1. Preheat oven to 350 degrees.
  2. Gently combine sliced peaches with sugars, cinnamon and vanilla. Set aside.
  3. For crumb topping, in a separate bowl add flour, sugar and cinnamon and stir gently to combine. Cut in butter until crumbly.
  4. In an 8×8 greased glass baking pan, add peaches and spread evenly.
  5. Sprinkle the topping evenly over the peaches.
  6. Bake for about 30 minutes or until the topping is golden and the peaches are slightly bubbly and tender.


I hope you enjoy this as much as I did! Have an awesome day!

Favorite Time of the Year!

I love Autumn! It’s my favorite time of the year. The colors, the flavors (yes I’m a pumpkin spice fan!), the fall festivals and events, love it all! And, if you have never gone to the beach in October or November, you must go at least once! The air is so refreshing and clear, the only noise you hear is the seagulls and waves crashing, and best of all….no crowds of people!!

On Labor Day weekend I started getting my fall décor out, I don’t have the space or the finances to decorate like some of the sites I follow on Instagram, WOW they are gorgeous and I love love love the look of the rooms! But for me, I just put a few things out for now. I have been working on gathering more, and I plan to make some pillows and throws within the next few weeks.

JoAnn Fabrics has their plaid material on sale so I will be checking that out today, I want to make pillows. And I have a few crocheted throws to make, one for my granddaughter and one for a friend at work.

I’ve also been bringing in a lot of Limelight Hydrangea flowers, I just LOVE those! And they dry so nice too so I can keep them year round.

Unfortunately, some of them are looking a little sad right now, with all the gray days and rain that we have had, they are not doing so well. My other plants are pathetic too. I already had to get rid of my petunias several weeks ago, I had black petunias and they were gorgeous but this year they were home to a ton of aphids that I could not get rid of, so they are gone.

I have Creeping Jenny in my planters and hangers, they are not doing well. And I have these gorgeous white and purple annuals that look like daisies, they are full of mold from all the rain. And my white marigolds are long gone!

So sad to get rid of the flowers, I usually can make it to October with most of my flowers but not this year.

So this weekend I will bring some mums and asters home, I try to wait until October so they can be around for Thanksgiving but my flower plan this year is not working out.

Hope you all are having a great weekend!

Happy Thanksgiving 2017!

I am not quite sure how it became Thanksgiving week, 2017. It feels as though I just planted all of my spring flowers. But now they are gone and I have pumpkins on my front porch.

By now I am usually swimming in Thanksgiving meal preparations and ideas, but my son and his family bought their first house and they want to have the dinner.

But part of me is still thinking of everything that I usually do this time of the year. I guess old habits do really die hard!  I will miss getting up early on Thanksgiving morning to get my turkey in the oven, going back to bed and then waking up to the house smelling amazing!

I always had the Macy’s Thanksgiving Day parade on while I cook.  And the kids in me still enjoys Santa at the end!

I am a little late in sharing this but if you are looking for a meal planner, I have a link to my blog post that will definitely help, the link is here Holiday Meal Planner

There are also links to some of my recipes for the holidays in that blog.

If you need a little encouragement on how to survive all the expectations of the upcoming holidays, I have a link to my blog post here Less Stress for the Holiday Season

Hopefully some of my suggestions are helpful.

I have to admit, Thanksgiving is my most favorite holiday.  The only expectation is the fellowship and meal with family and friends.  But for me it is also the kick off to the Christmas holiday.

Remember to enjoy the holidays and your family and friends.

Happy Thanksgiving!